


Table of contents
- Understanding Docker's Working Principle
- Unlocking the Potential: Use Cases for Docker
- Adopting Containerization: Efficient and Streamlined
- Unveiling Docker's Architecture
- Important Docker Terminologies
- Docker Daemon
- Docker client
- Docker registries
- Dockerfile
- Docker Image
- Containers
- Parts of Docker
- Docker Commands
- 1. To run an image.
- 2. To check all the locally downloaded images.
- 3. To download an image.
- 4. To list down the containers.
- 5. To start an interactive shell or environment:
- 6. To stop a container.
- 7. To check all the containers (also the stopped ones).
- 8. To remove a container.
- 9. To delete all the stopped containers.
- 10. To remove the images.
- 11. To share our container.
- Notes:
- Creating our own Docker Images.
- Docker Volume
- Various ways to create a volume
- Docker Port
- Important Commands
- Extras
- How to push your docker image on the Docker Hub
- Important Commands
Docker has transformed how we create, test, and deploy apps. It is a robust container technology that allows developers to bundle programs and dependencies into lightweight, portable containers. These containers may then be deployed uniformly across several environments, guaranteeing that the program performs properly across.
Understanding Docker's Working Principle
The Dockerfile, a text-based script that specifies an application's environment, is crucial to Docker's functioning. Dockerfiles enable developers to quickly generate Docker images, which are self-contained snapshots of an application and its dependencies.
Unlocking the Potential: Use Cases for Docker
Docker finds uses in a variety of contexts, making it an adaptable tool in the field of software development. Some prominent use cases are:
Microservices: Docker allows for the simple deployment and scalability of microservices-based systems. Docker encourages modularity and flexibility while developing large systems by enclosing each microservice in its container.
Data Processing: Docker makes it easier to deploy data processing applications by providing a uniform environment for technologies like Apache Spark and Hadoop. It guarantees that all necessary dependencies and configurations are correctly set up, saving time and effort.
Continuous Integration and Delivery: Docker has become an essential element in CI/CD processes. Docker allows developers to construct standardized build environments that assure consistent testing and deployment at various phases of the software development process.
Containers as a Service: Docker serves as an infrastructure for container-based services, enabling organisations to deliver scalable and controlled container environments. It provides on-demand container provisioning, making application deployment easier and eliminating the need for manual configuration.
Adopting Containerization: Efficient and Streamlined
One of Docker's primary benefits is its use of containerisation. Unlike traditional virtual machines, which run whole operating systems on top of a host OS, Docker containers run on a shared OS kernel. This method avoids the overhead involved with running multiple operating systems concurrently.
Docker containers are lightweight, portable, and quick to start because they use operating system virtualization. They encapsulate the program and its dependencies, guaranteeing consistent behavior regardless of the underlying hosting environment.
Unveiling Docker's Architecture
Docker has a client-server architectural approach, which allows for seamless communication and interaction between many components:
Docker Client: The Docker client is the primary interface for developers to communicate with Docker. It communicates commands and requests to the Docker daemon, which builds, runs, and manages containers.
Docker Daemon: The Docker daemon manages Docker's basic functions. It handles operations including creating Docker images, maintaining containers, and coordinating their execution.
Here's a visual representation of Docker's architecture:
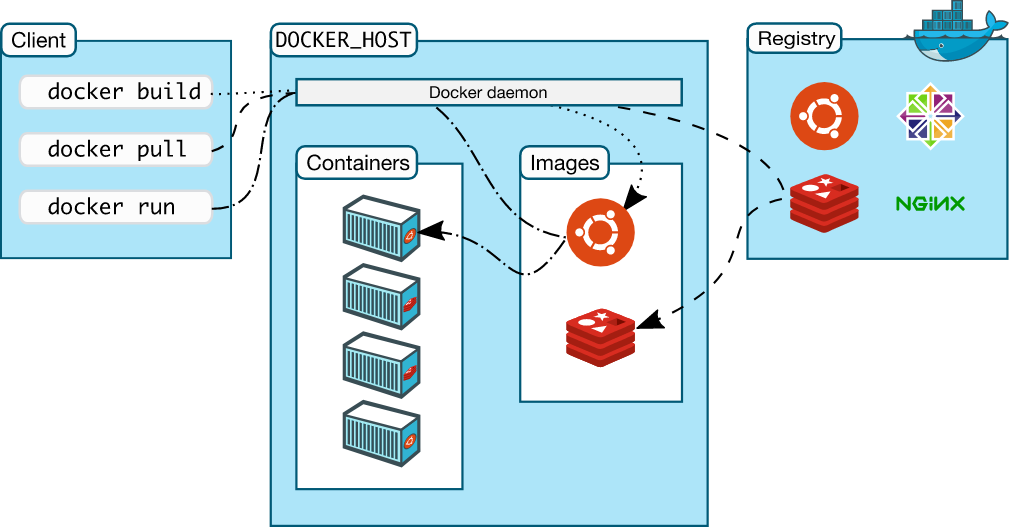
Docker's design facilitates seamless cooperation between developers and system administrators, resulting in efficient application deployment and administration.
In the next part, we'll go over the essential ideas of Docker and how to get started with Docker to construct and deploy applications.
Important Docker Terminologies
Docker Daemon
It listens for API calls from the Docker client and maintains Docker objects such as images, containers, networks, and volumes.
Docker client
It is used to communicate with Docker. When we run the command, the client sends a request to the daemon, which then conducts the necessary operations. A single client can interact with several daemons.
Docker registries
It stores Docker images. The Docker Hub is a public registry that anybody may use.
When you pull an image, Docker looks for it in the public registry and stores it in your local system's
DOCKER_HOST.You may also save photographs to your workstation or upload them to the public registry.
Dockerfile
It provides the procedures for creating a Docker image. These pictures may be used to generate containers in any context. These images can also be saved online using Docker Hubs.
When you execute a Docker image, you'll obtain Docker containers.
Docker Image
It is a file that contains the instructions for creating a Docker container. It is analogous to taking a picture of a virtual machine.
Docker Images are used to generate Docker containers.
Images are immutable. The files that make up a picture remain unchanged.
Images can be saved both locally and remotely.
A picture can consist of many images. This process is known as layering.
The
name:versionthe format is widely used for image labeling in Docker.
Containers
A container is a runnable instance of an image, which is essentially where our program executes.
Containers may be managed using either the Docker API or the CLI.
We can link a container to one or more networks, attach storage to it, or even construct a new image from its existing state.
We know that the container does not communicate with the outside world. This container contains a tiny version of the operating system as well as the necessary dependent files to run the program.
Every container has a unique identifier.
Let's see it more simply:
  +-------------+           +-------+          +-----------+
  | Docker File |  --run--> | Image | --run--> | Container |
  +-------------+           +-------+          +-----------+
Parts of Docker
1. Docker Runtime
It lets us start and stop the containers. The Docker daemon interacts with the runtime to execute our commands. There are two types:
runc: It's a low-level runtime. Its function is to interact with the OS and start/stop the container.containerd: It is a high-level runtime. Its role is to manage therunc(low-level runtime).Other functions include network interaction, data and picture retrieval, and so forth.
It also serves as the runtime for Kubernetes.
2. Docker Engine
It helps us to interact with Docker.
- Example: Docker daemon.
3. Docker Orchestration
Docker Orchestration is the process of managing many Docker containers, automating their deployment, scaling, and coordination so that they operate together smoothly, assuring the efficient and dependable running of containerized applications.
- Consider Docker containers as distinct building pieces comprising various components of your program. Docker Orchestration acts as a conductor, bringing these building parts together and ensuring they operate in harmony.
Docker Commands
Let us now look at the various commands associated with Docker.
1. To run an image.
docker run hello-world
It means hey Docker, run the image named
hello-world, If it is not available locally, get it from the Docker hub.We may also use the inspect command (with both the container-ID and image-name). Example:
  docker inspect container-ID

  docker inspect image-name
We can also run the image in the background using the
-dcommand. Example:docker run -d ubuntu- Here
-dflag means detach mode.
- Here
2. To check all the locally downloaded images.
docker images
3. To download an image.
docker pull image-name
We can also download specific versions using the
;symbol. Example:docker pull ubuntu:16.04We can also check only the IDs of the images.
docker images q
4. To list down the containers.
docker container ls
5. To start an interactive shell or environment:
docker run -it image-name
We may also attach a certain shell to the container. For example, if we wish to attach a bash shell, we may use the container ID.
docker container exec -it container-ID bash- To execute the above command, the container must be operating in the background.
6. To stop a container.
docker stop container-ID
7. To check all the containers (also the stopped ones).
docker ps -a
8. To remove a container.
docker rm container-ID
9. To delete all the stopped containers.
docker prune -f
- Here, the
-fflag means don't ask again just delete them.
10. To remove the images.
docker rmi image-name -f
To remove all the images, we can pass the images-IDs of all the active images with the
rmicommand as:docker rmi $(docker images -q)- Note: When a container is running, then its image will not be deleted.
11. To share our container.
First, we can commit the changes just like we do in Git.
- Command:
docker commit -m "message" container-ID Image-name
- Example:
docker commit -m "modified info.txt" 408bd12547vg MyApplication:1.01
Notes:
- We can also specify the port to run a container using the
pflag. Example:-p 8080:80 nginx.
Creating our own Docker Images.
First create a docker file. The name convention is
Dockerfile. Example:touch DockerfileWrite the content of the Dockerfile. Example:
 FROM ubuntu
 MAINTAINER maintainer-name <maintainer-email-id>
 RUN apt-get update
 CMD [“echo”, “Hi”]
In the above command:
First, we are giving the name of the base image.
We are giving the Maintainer Details.
Writing the command that should run while the container is being created i.e.
RUN apt-get update.Finally, write the command that should run after the container is created i.e.
CMD [“echo”, “Hi”]. Here we are using theCMDtag for specifying the executable commands to run.- We are giving the commands in the form of an array like:
["command-1", "command-2", ...].
- We are giving the commands in the form of an array like:
To build an image out of the docker file, we can use the
docker buildcommand. Example:docker build -t myImage:1.01 <path-to-docker-file>Here the
-tflag (tag flag) is used to tag the image being built with a specific name and optionally a version number.To push the data to the Docker repository, we first need to log in to the Docker with the terminal. We can use the
docker logincommand and then enter the username and password.Finally, to push the Docker image to a Docker repository, such as Docker Hub, we can use the
docker pushcommand. Command:docker push [OPTIONS] NAME[:TAG]Example:
docker push username/myImage:1.01
Docker Volume
A volume is a directory that is shared by many containers or the container itself and the host. Even if the container is stopped, the volume can still be accessed.
The volume will be produced in a single container.
When constructing the container, you must define the directory as a volume.
When we update the image, the current state of the volume is saved for future sharing. It does not receive updates.
Volume can be shared between containers as well as between a container and its host.
Even if we delete the container, the volume is not removed.
Various ways to create a volume
1. From Dockerfile
Create a Dockerfile and write:
 FROM ubuntu
 VOLUME ["/<volume-name>"]
Create an image out of the file:
docker build -t <image-name> .
- Here, `` .`` resembles the current directory.
Create a container from this image:
docker run -it --name <container-name> <image-name> /bin/bashShare the volume of
container1with another container (Example:container2):docker run -it --name container2 --privileged=true --volumes-from container1 ubuntu /bin/bash
 - Here,
   - ``--privileged=true`` means we are granting extended privileges on the host system.
   - ``--volumes-from container1`` indicates that the new container (``container2``) will inherit the volumes from an existing container (``container1``).
2. Using commands
Add the volume flag in the run command to create a volume while creating the container:
docker run -it --name <container-name> -v <volume-name> ubuntu /bin/bash
- Example:
   ```docker
   docker run -it --name container1 -v /myNewVolume ubuntu /bin/bash
```plaintext
- Here,
   - ``-v`` is the flag that is used to set the name of the volume, we also specify the name of the volume along with its path.
Share the volume of
container1with another container (Example:container2):docker run -it --name container2 --privileged=true --volumes-from container1 ubuntu /bin/bash
3. Create a shareable volume between the host and container
Suppose the host directory is /home/ec2-user and the container volume is myNewVolume.
Add the volume with the run command:
docker run -it --name <container-name> -v /home/ec2-user:/myNewVolume --privileged=true ubuntu /bin/bash
- Here,
  - ``-v /home/ec2-user:/myNewVolume``: creates a Docker volume that is mapped to a directory on the host machine. In this case, it's mapping the ``/home/ec2-user`` directory on the host to ``/myNewVolume`` within the container.
Docker Port
Initially, the port is not open in a container; we commonly setup ports in containers using publish or expose tags.
Important Commands
To check the port of a container
docker port <container-name>
To configure a port
docker run -p <host-port>:<container-port> <docker-image>
Example: If we want to map port 8080 of host to port 80 of the container, we can use:
docker run -p 8080:80 myImageHere,
-pstands for publish.
Extras
Difference between docker attach and docker exec
The exec the command creates a new process in the container's environment but the attach the command connects the standard I/O of the main process inside the container to the corresponding standard I/O of the current terminal.
Difference between expose and publish
If we do not specify the
exposeor-p, then the services in the container can only be accessible from inside the container.If we
exposedocker containers can access a port then the services in the container but the outside world cannot access it.If we
publisha port then the container services automatically gets exposed and it is accessible by everyone.
How to push your docker image on the Docker Hub
Create a new Docker image from the existing container:
docker commit <container-name-or-ID> <image-name>Give a tag to the image:
docker tag <image-tag> dockerID/<image-name>Login to
hub.docker.comPush the image to the Docker Hub:
docker push dockerID/<image-name>
Important Commands
To list all the volumes:
docker volume lsTo create a volume:
docker volume create <volumeName>To remove a volume:
docker volume rm <volumeName>To remove all the un-used or un-shared docker volumes:
docker volume pruneTo check the details of a volume:
docker volume inspect <volumeName>To inspect a container:
docker container inspect <containerName>Stop all the running containers:
docker stop $(docker ps -a -q).Delete all the stopped containers:
docker rm $(docker ps -a -q)Delete all the images:
docker rmi -f $(docker images -q).